Epyon Custom - My First Commission
DomusMachinas on Mar 29, 2023

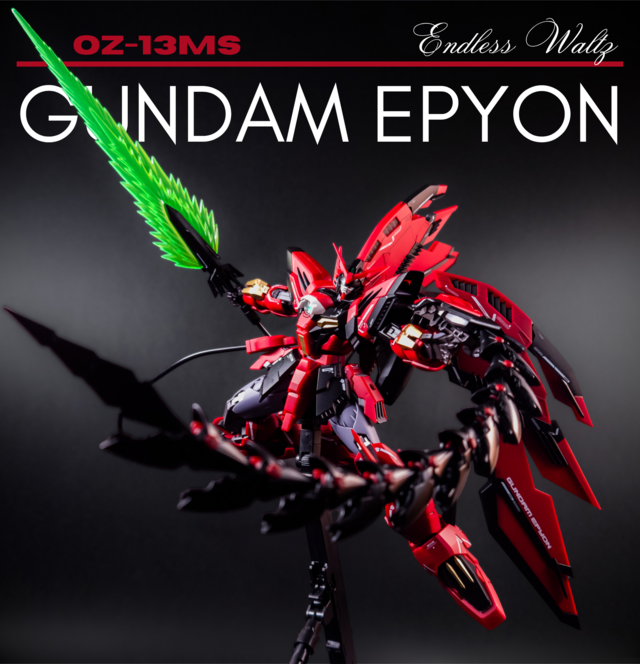
Base Kit
MG OZ-13MS Gundam Epyon EWFirst Commission
A work friend who humors me by pretending to be interested in all of the many hobbies and pursuits I have has demonstrated a genuine connection with the giant robots. Since he has no history with the Gundam franchise his excitement really illustrates the effect that giant robots can have on people. After a few chats and looking at different customs together for inspiration. There was an RG Sazabi customized by Gunplahrazzi that we saw on Instagram which he really enjoyed that primarily informed direction he wanted to go.
Check the video and social links to see Gunplahrazzi’s awesome work:
After ruminating on the ideas for the weekend my friend produced an Amazon gift card and told me to pick a 1/100th scale mobile suit and surprise him, just make it shades of matt gray with orange accents. I haven’t done much painting yet, so I’ve ordered the Tamiya spray cans in the colors we’ve settled on, color scheme below;
- Metallic Orange TS-92
- NATO Black TS-63
- German Grey TS-4
- Medium Gray AS-28
- Light Ghost Gray AS-26


Inspiration
As this will be my first fully custom painted build I want to make sure that my color scheme looks intentional and will flow well. Time to search and see what other people have done with the Epyon.
Sources for inspiration pictures;


Takeaway
I’m going to take the color separation on the tail from the purple build, but it will be light and dark gray with either black or orange on the pivot bolts. The yellow accents on the model by GDF will translate nicely to orange. And I think I’ll keep most of the black areas from that model black on mine. Anything done in white on his build will be shades of gray, but I’ll use the other model as a template, purple areas will be lighter gray and anything which is black on Guardian’s color scheme but white on GDF’s will be dark gray on mine.
Departures
Other orange accents
- Vent fins on sides of shield (anything light gray on shield in the original color scheme)
- Wing vents
- Wing fins
- Shoulder vents
- Underarm vents
- Lower Vents on front, side, rear skirts
- Inner foot area that shows between the “sole” and “laces” area of the shoes
Toast to new experiences
Raising my mezcal to new experiences, and to Bruce, who commissioned this piece. Jumping around in the manual to nip out just the parts that I’m painting orange is a total departure for me, and it’s very nerve wracking cutting random pieces off of runners willy-nilly.
Orange parts primed and ready for paint tomorrow. Bed time.


Up before my alarm this morning to get the primed parts sprayed. I’m still a bit apprehensive about having so many pieces cut out from the runners to paint them before assembly. I think I may pivot during the next session and start assembling frame parts so that I can snap painted pieces into place as soon as they’re dry, maybe even top coat as I go. because if I get too many more pieces cut out without a great organizational system then I’m in for a big headache later.

Finally building
After a small mistake (and by “small mistake” I mean I tediously primed, painted, masked and painted again over a dozen pieces) wherein I realized that the two medium to dark gray tones that I have are effectively the exact same color I now have a completed shield with whip and wings. I’m not unhappy about the look, but I’m a little irritated that I have two of the same gray lol. Also a lone section of the whip broke and refused to be repaired. Hey it’s “custom” 🤫


Decals and stickers
I was able to get all of the stickers and decals applied after adding some panel lines with the Gundam marker. The dry transfers are a bit of a headache when it comes to applying them to a curved part, but for flat parts I think I actually prefer them to water slides. However Bandai, in their infinite wisdom have included a sheet of standard stickers as well. Why they wouldn’t just make a slightly larger decal sheet instead in beyond my comprehension, but alas, here I am with stickers.
Next steps
I have an idea to camouflage the iniquities of the regular stickers. I’m thinking that if I hit the kit with a glossy top coat it might blend the hard edges of the stickers and make them look a bit less harsh. Then I’ll go back over everything with my Mr. Super Clear matt top coat.
I’m going to throw some stickers onto my Gframe13 to test this hypothesis first, but in theory, I think it should work nicely. Even if it doesn’t hide the edges as much as I hope, I’ll be happy for the extra protection to keep the stickers and decals from peeling in the future as this is a commission.


K.I.S.S
I did try the gloss coat before matt coat, but all it really did was introduce orange peel. Oh well, you live and you learn.
That was very irritating, but I’m happy it’s done!
And on to the photos!