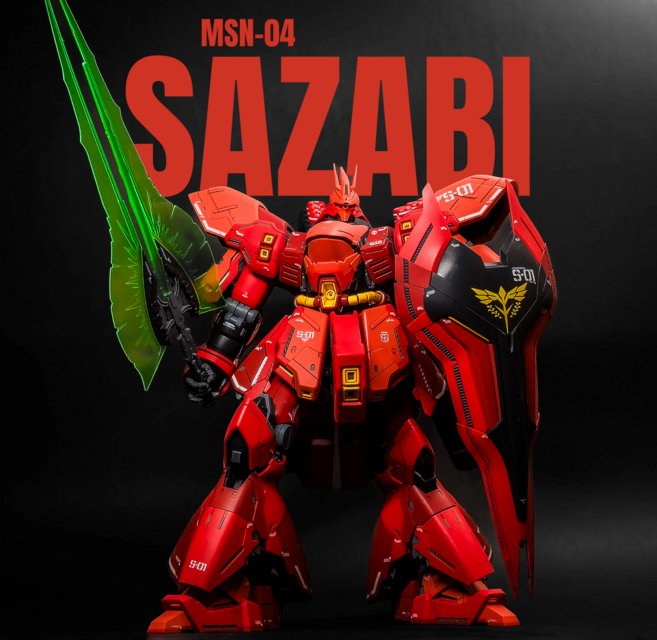
Beginning Notes
Not only was this kit gifted to me by a friend along with several others, and the one my 8-year-old has been most excited for because “it’s so buff,” but it represents a few firsts for me in the short time I’ve been enjoying this hobby;
- The Sazabi is my first Katoki version kit.
- This is the first time I’ve introduced non-Bandai parts into a build (the DOT workshop metal frame kit from USAGundamStore.com)
- Although this is the third MG kit I’ve undertaken, this will be my biggest build yet and certainly the heaviest by far with the addition of the metal frame.
I was contemplating building the RG Sazabi as an amuse bouche before undertaking the Ver. Ka, but since I received the metal frame kit I’m just too excited to do another kit before starting this.


Getting Started
On seeing the amount of pieces included in the metal frame kit, I had quite wrongly assumed that the frame would be pretty much entirely assembled from metal parts, I’m sure had I searched for any informational videos prior this wouldn’t have surprised me. Luckily thanks to Google translate live view, it’s fairly straightforward to figure out which bits go where.
Let’s go.


Break
Here’s my small workspace after the torso build, now I’m taking my family swimming. Back at it shortly.
.png)
Head, Shoulders and Arms
After our pool fun I hopped back into the build for a couple of hours, pretty impressed with the metal parts for their relatively affordable $35 price tag. There are some challenges, like fitting all of the pins and pylons up exactly between two opposing shell parts. No different than the difficulties you’d expect with their plastic counterparts, but obviously since there’s no give in the metal whatsoever it just takes a bit of finesse to get it right. Aside from that, some of the plastic pieces are an extremely tight fit into the holes on the metal parts, but while that’s frustrating going together it will be for the best in the long run. It’s also very easy to cross thread the cheap screws included in the metal kit, so it’s worth taking the extra steps to spin them left a few turns before sinking them. Handling the arms with the metal parts installed it’s clear that this is going to be a very heavy finished product. I can hardly wait.


.png)
Late Night Torso Teardown
Had some questions about the fitment of the metal V-fin, and upon review of some YouTube slideshows I noticed that I forgot two large metal chest subframe plates. Luckily everything came apart without fuss and went back together just as easily. This thing is an absolute unit with all the metal bits installed. When attaching the shoulder pads the metal arm joints were just too tight to fit through the D-shaped holes on the shoulder pad brackets. I had to carve out a bit of plastic before I finally got them through, but you can see in the photos it’s pretty tight and it created some white stress marks, but overall doesn’t seem any worse for wear and and multiple assemblies and disassemblies the shoulder pads are still fixed firm, all good signs for the longevity of this model.
Okay, time for bed.


Day 2; Waist and Feet
After church my 8-year-old put together the shield while I chipped away at the waist and feet. The feet were very difficult. They each use five pieces from the metal build kit making them fairly heavy. The ankle joints in particular is are very tough. A metal ball fits into a small plastic rotator cuff that was previously sandwiched and bolted between two other metal plates and it is too tight. The Japanese instructions reference using a tool to pry the joint together, but are non-specific as to what kind of tool or how to achieve that… and unfortunately YouTube completely failed to provide anything that demonstrates this. If it’s covered in any of the videos I reviewed then they only speak about it in Japanese. Ultimately I wrapped the parts in a rag and just worked them until my hands hurt. They’re together now, though, hopefully for good.


Home Stretch
After enjoying episode 7 of Last of Us with the wife this evening I sat down to power through the rest of the legs with the goal of at least getting this behemoth standing on its own feet before the end of the weekend. There are a lot more trim panels that tuck under other panels than any other kit I’ve done, the tolerances are so slim in some cases that even when everything is fit as tight and flush as you can get it, there’s still a bit of a gap. I’ll chalk that up to the aftermarket parts and inexperience. Nevertheless, she stands. Banana for scale:


I know I keep yammering about how heavy these metal parts are, but now that it’s 95% assembled, I really can’t stress enough what a dense piece this is. Although I don’t paint, I may well end up figuring out a matte clear coat for the plastic to really make those metal joints shine through. Or not, I don’t know yet. It’s late and I work in the morning. Here’s a little beauty shot before bed:
.png)
Backpack and Weapons
Knocked out the backpack and weapons last night. Which I thought was going to be a cakewalk. I was right about the weapons at least. The backpack however was a slightly different story. That said, the actual main backpack unit wasn’t so bad, but the six individual funnels were a headache:

Pardon me if I don’t remove them for pictures, but I’ll likely never take those out of the backpack again. They are only about an inch tall when fully assembled, but each one is made up of nine separate parts. The “funnel” portion of these is comprised of four plates that fan open when you press the top and bottom together. Nothing but a small amount of friction holds those fins around the bell-end while you’re trying to get the rest of the unit lined up and assembled. There are two separate sets of holes that have to line up in order for the assembly to hold. One set is four cut outs, one on each quadrant around the bottom of the upper cylinder which fit over the mounts of the funnel plates. And the other is a set of three pins on an inner gray piece which have to line up with the three holes at the top of the upper cylinder. This puzzle and my complete inability to read Japanese lead to multiple failed attempts at assembling the three funnels I didn’t accidentally get right the first go. That was a fun 17 minutes…


.png)


Decals
Everything in me is pushing to call it done now. While I have added the accent color stickers to other kits, I’ve never gone the full distance and applied the small decals and text markings. I’m still extremely new at this and I’d like to be more confident with scribing and panel lining. I’ve started to dip my toe in on a few cheap high-grade kits, but my scribing skills are trash, so I’m unwilling to do that yet on a masterpiece of a kit like this. Panel lining isn’t out of the question, but I don’t know if it’s really worth waiting to apply the decals until it’s lined.
I have some thinking to do.
Panel Lining
After poking around YouTube to learn more about panel lining technique, I opted to use a paintbrush with black Vallejo Black Mecha Weathering wash to panel line. The experimentation I did on my SD Wing kit with the the Gundam Marker I purchased from USAGundamStore left a lot to be desired, so perhaps I’ll reserve the marker for cheaper kits with less detail.
Baked-in Detail
This kit is not lacking in detail, there’s a ton of separate overlapping panels which provide actual real panel separations, and there are plenty more molded panel line separations on the outside armor plates. Unfortunately the majority of molded lines suffer from 1 of 4 issues;
- They lack enough depth and/or are too wide to give the wash the capillary action.
- Lines which depict a place where one panel overlaps another have no depth at all, which in most cases make a line extremely difficult to define with the paint (this may be an area where the marker would work better, but I’m not interested in testing that hypothesis on this kit)
- Because of the sheer number of pieces that compose the Ver. Ka’s armor panels many of the lines are actual separations between two separate pieces of armor, which I could line, but could look pretty silly when the armor is vented open for an action pose.
- Some of the smaller sunken details showing exhaust ports or implied light lenses are almost impossible to clean up any wash that didn’t stay neatly in the lines leaving a sloppy look to those small areas.
All of that said, I’m pretty happy with the looks after panel lining to to best of my ability. There is still a lot of opportunity for gorgeous panel lining if I ever sack up and learn to scribe. Maybe I’m suffering because of my tools, I don’t know, all I do know is that I have an Entry Grade Strike Gundam that I did such a hack job scribing, it will only be usable when I eventually try my hand at adding battle damage and severe weathering.
Decals tomorrow?

Water Slide Decals
Per my ritual, I researched before tracking the water slides, collected my kit;
- Point tipped tweezers (The set I use are angled)
- Q-tips
- Bamboo skewers
- Water bowl
- Knife
Before I started I had a good handle on what was required to successfully install these, however what I didn’t fully understand was how easy it is to tear them. I may, or may not have (but definitely did) tear the largest and most prominently displayed decal by being a bit to rough with a Q-tip trying to rub away the water. My bad. After 2.5 hours of; dip, slide, adjust, dab, dip, slide, adjust… I’ve managed to install 21 out of over 150 decals before I had to call it a night.

Day 2 of Decal Application
After seeing how an improperly handled decal starts to flake, I decided to invest in some Mr. Super Clear Matt top coat spray. I was pleasantly surprised to find some at a local chain hobby store. I also grabbed some alligator clips while I was there. Now that I have settled on adding still another step to my finishing process I’m certain that I’ll never finish the build and this post will never see the light of day…
Another three hours of decal application and, two more ripped decals, I’ve only managed to apply about 30 or so decals.
Also I decided to keep the V-fin antennas off until I’m done with decals, because the aftermarket metal ones don’t fit snugly and I’m afraid I’m going to lose them before I finish this build, so Sazabi will be pictured bald for the time being. Here’s a update with more decals.

Day 4
Finally… After five sessions of only decal work spread across four days I’m completely finished with water slides now. To quote Leonard Hofstadter “That was a very pleasurable 139 and a half hours” During the break between sessions four and five today I added four other Ver. Ka kits to my Amazon wishlist. Here’s the update:
.png)
What’s next?
Will game-plan disassembly for top coat application tomorrow. But for now, bed. Goodnight.
Disassembly
Just FYI, water slide decals WILL betray you when you’re trying to take panels off to top coat, and this behemoth of a kit has A LOT of panels.
I went with the Mr. Super Clear Matt top coat. I’ll switch it up and use the gloss top coat when I build the RG Sazabi the HG Schwalbe Graze I have in my backlog.
Top coating hides a lot of imperfections. I intentionally tried to go light on the top coat because you can always add more, in a few cases I did need to add more, I had trouble getting full coverage on the propellant tanks in particular. But in the case of one of the funnels I ended up with quite a bit more on the top coat than I intended. But as I never plan to pull those funnels out after they’ve been top coated and installed, the funnel storage units on the backpack will hide a good deal of indiscretion.
Overall, I’m VERY much liking the matt top coat so far. After I’m done applying this coat and reassembling, I think I’m good to call it done! Top-coat update images incoming.
.png)
.png)
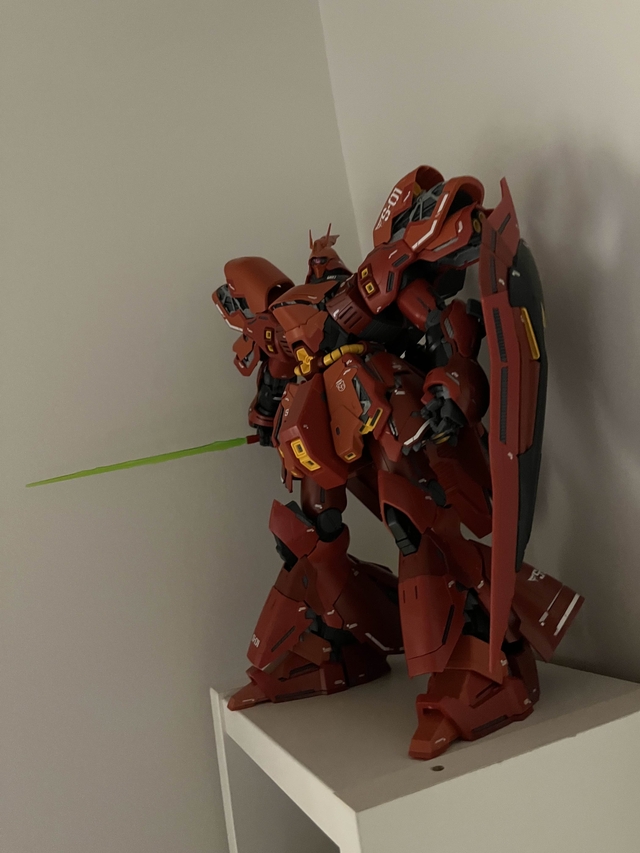
Finally Complete
I started this kit with zero experience with any kind of customization or finishing. I was a snap-builder through and through. But after seeing the scale with this I started to realize this kit deserved more than I was yet capable of. I didn’t go crazy by any means, but I am extremely happy with my choices for finishing.
This project has definitely forced me to up my game. I’m excited to start tuning these new abilities on so high-grade kits. Really want to go back and dress up some of the kits I’ve already built, but I’m not sure I’ll be able to bring myself to do it. We’ll see. That said, I used over one entire can of the Mr. Super Clear matt top coat, so I think on the next build I need to figure out how much I should expect to get out of one bottle, and how to maximize the bottle. It’s not expensive, but a whole can for a 1/100th scale really seems excessive. Can’t argue with the results, though.
Check out this beauty: